- IO-Link cylinder sensors
- Applications
Simple cylinder sensors can improve OEE
What is OEE?
An important key indicator of Industry 4.0 implementations is Overall Equipment Effectiveness (OEE), a measure of manufacturing productivity. Consisting of 3 factors, OEE measures machine uptime (Availability), machine speed (Performance), and non-defective products (Quality). The calculations are quite simple.
While the calculations are simple, understanding how to improve OEE can be challenging. The first step is to evaluate the losses in your process.
Typical manufacturing losses can be categorized in terms of Availability, Performance, and Quality as shown in the chart below.
An OEE score of 100% means that the process is always running during planned production time, at its maximum speed, making all good parts.
How can simple cylinder sensors help improve OEE? IO-Link unlocks trapped data within sensors. Explore these applications for cylinder sensors with IO-Link for the possibilities!
Early detection of damaged seal
The seal is an essential part for a pneumatic cylinder. During their working life, cylinders are subjected to continuous service cycles. Proper diagnostic techniques can assist the user to assess the efficiency of the cylinder. Early detection of failures lead to significantly reduced unplanned downtime. In addition, a more complete and in-depth understanding of the failure can suggest ways of improving performance of the system.
ifm’s cylinder sensor with embedded IO-Link has an internal stroke timer. Travel time between both end positions is monitored and compared with the reference travel time under normal and optimized operating conditions. For example, a damaged seal will no longer prevent leakage of the compressed air. With the same amount of air supply, the piston moves slower than designed speed. A threshold can be set by the user and if the travel time exceeds the threshold, the user will be alerted. This will enable the user to investigate the issue and plan the repair and replacement before the complete system fails.

Monitor life cycle of cylinder
Most pneumatic cylinders are designed and quoted by traveled distance or operating cycles. Usually, cylinders are ignored until they create problems or unplanned downtime. Once a cylinder enters its wear-out phase of the life cycle, the failure rate increases exponentially. It can be reflected in frequent maintenance and service required, or reduced performance (e.g., a pneumatic cylinder is used to drive a cutter, but the quality of the cuts reduces due to reduced performance of the pneumatic cylinder.)
Via IO-Link, a threshold cycle counter can be set by the user for planned maintenance purposes or to replace the cylinder before the wear-out phase of the designed lifetime. By doing this, failure associated with wear-out phase can be significantly reduced or even eliminated. No more unplanned downtime due to failing cylinders.

Detect slow cylinder movement
Performance losses are often neglected. They happen silently and continuously destroy the OEE while being accepted as a norm. Slow cycle and micro-stops are the two major contributors to performance losses. Slow running machines do not attract attention and there is normally no measurements or indications when machines are running slower than designed. The most common causes of slow cycles are worn out or poorly maintained equipment due to poor lubrication practices and substandard material. Pneumatic cylinders are one of the most typical components in manufacturing equipment. There’s no effective and efficient method to monitor the actuation speed. Lack of process transparency can lead to failure and furthermore, unplanned downtime.
The cylinder sensor with IO-Link is equipped with an internal stroke timer. Reference time can be taught automatically or can be set according to the specification of the cylinder. A threshold of slow cycle can be defined by the user, once the sensor detects a slow running cycle, the sensor will send a signal to the higher-level controller to alert the user that the desired cycle time of the cylinder is not reached.
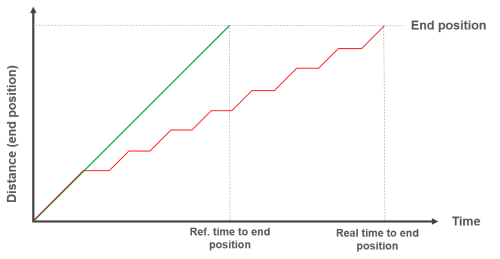
A specific instance of slow cylinder movement is the “stick-slip” effect where the end position of the cylinder is reached, but the time to reach the end position increases.
Causes of the stick-slip effect of the cylinder include but are not limited to the following:
- Increased friction inside the pneumatic cylinder.
- Insufficient lubrication due to wear-n-tear or malfunctioning of the lubrication unit.
- Compressed air supply issue
- Material (stuck, wrong material for the application.)
Without monitoring, this might never be noticed and corrected. The production manager may notice a slow and slight drop in throughput over time but can never find out why. The build-in stroke timer can compare the real-time to end position and the reference time to end position. If the time needed for the piston to reach the end position exceeded the threshold set by the user, the sensor will send a signal to alert.
Inline missing part detection
The quality of product is always one of the highest priorities in a manufacturing plant. Quality control is a subset of quality assurance and is the reactive component of quality management. For example, outgoing inspection occurs after the product has already been made and quality control measures prevent defects from going to the customers. This is commonly referred to as a lagging indicator. Quality assurance on the other hand, is a proactive component of quality management. It is process-based leading measures.
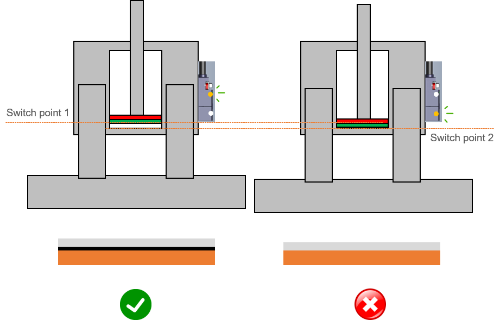
In this application, an o-ring is placed between the electronics and the aluminum cover to make it water-tight after welding. The o-ring is invisible after assembly. A pneumatic cylinder actuates the holder to press all parts together and the part is sent to the welding cell to be welded. The welded parts go through the rest of assembly processes and are leak-tested before packaging. Failure can only be caught after leakage test and will be scrapped since rework is impossible.
Since the o-ring is invisible after assembly, any vision-based solution does not work. ifm’s cylinder sensor with IO-Link monitors the position of the piston continuously with 0.1 mm resolution. If the o-ring is present, the piston does not travel all the way to the end position. The thickness of the o-ring is approximately 1 mm and the sensor detects the gap reliably. If the o-ring is missing, switch point 2 will turn on and send the signal to the higher-level control to stop the welding process.
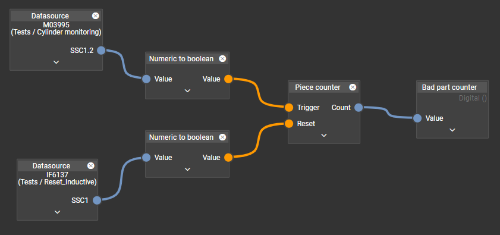
The built-in stroke counter of switch point 1 and switch point 2 can be used to count good and bad units.
The calculated values available in the moneo IIoT software platform can be used to count good and bad parts.
Double blank detection
If two or more metal sheets pass through a processing machine, it could lead to serious problem in the tooling and product quality. The extra thickness from unintentionally fed metal sheets can cause significant damage to tools, ties, and create falsely stamped defects. The damage can be so severe that the production line is shut down. This leads to unplanned downtime, which can be very costly and time consuming to restore the production.
Since ifm’s cylinder sensor with IO-Link has very high resolution of 0.1 mm, when pneumatic clamps are used to clamp the sheet metal to a workstation, the sensor is able to detect the thickness of the workpiece by means of distance traveled of the piston inside the cylinder. The advantages of this double sheet detecting system is that the sensor can be integrated directly into the existing pneumatic system without extra installations of double sheet detectors. The sensor can be installed within seconds and the configuration of the sensor can be done with a click of a button.
Process quality drift detection
For manufacturing processes, unintended deviation of the process from desired setting and performance parameters happen over time. This is known as drift. Every process drifts. Most of the time, the drift is not detected if the quality characteristic of products are within predefined normal limits. However, the process drift may already happen way before we realize. It is way too late when the machine starts to produce defective parts.
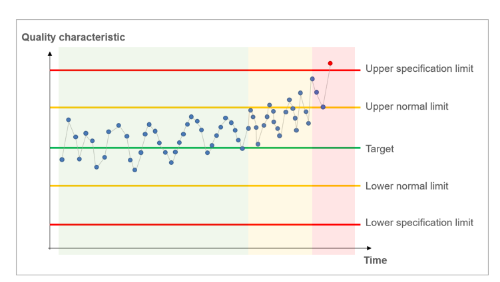
Cylinder sensors with IO-Link can detect drift indirectly through monitoring the time between piston strokes. For example, a pneumatic cylinder is driving a cutter that cuts plastic housing into desired shapes, when the seal of the cylinder started to wear and tear, the cutting quality is affected. There may be incomplete cuts or rough edges. Maintenance staff may replace the blade, but soon realize that the problem persists. The IO-Link cylinder sensors will monitor the travel time between two end positions, if the seal is damaged, it will take longer for the piston to reach the correct position. When this happens, the sensor will send a signal to alert the user. Corrective and preventive measures can be applied to prevent further deterioration of the process.
Indirect part measurement
The sensor with IO-Link has excellent resolution and provides continuous process values along the monitored range. For example, if a pneumatic cylinder's actuated gripper/clamp is used to pick up a variety of parts with different dimensions, the big challenge it faces is how to recognize the parts and not to drop it during operation. A couple options can be considered, e.g., to use a vision-based solution such as a camera. However, the cost of the solution and the complexity of the integration makes it difficult to implement.
What if we can provide a simple and cost-effective indirect measurement solution that does the job reliably and there is no associated integration complexity or costs?
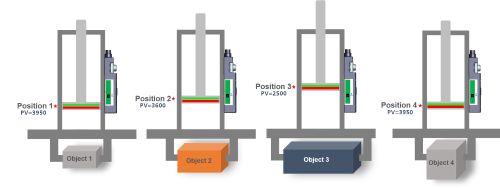
The end position of the piston of the pneumatic cylinder is directly related to the opening/closing position of the gripper/clamp. Different end positions can be programmed to recognize different parts. The resolution of the cylinder sensor is approx. 0.1 mm, that gives the user great flexibility to differentiate parts accurately along the monitored range of around 50 mm.
How does this work?
Note the process value (PV) changes in the image below. The process value is a unitless number that is relative to the cylinder stroke position. Of course, if two objects are of identical width (< 10 µ), the sensor cannot differentiate between the objects.
