Thank you for your purchase of a Pprox displacement sensor. On this page, you will find information to help you install and program the sensor as well as answers to frequently asked questions.
Should you need additional support, feel free to contact our service center at 800-441-8246 and speak to one of our applications engineers.
Installation
This device achieves the accuracies specifiied in the data sheet after a 15-minute warm-up period.

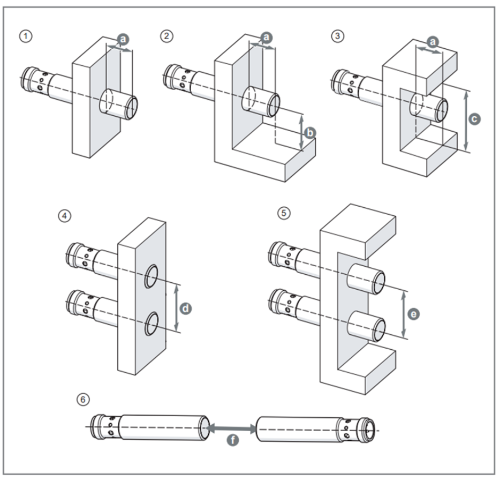
M12 installation conditions (IFO20x)
| Application configuration | Target | Type | Installation | a | b | c | d | e | f |
|---|---|---|---|---|---|---|---|---|---|
| Factory calibration | aluminum 24x24 | M12 | flush | 6 | 12 | 36 | 24 | - | 8xSn |
| aluminum 36x36 | non-flush | 24 | 18 | 48 | - | 36 | |||
| 1-point calibration | aluminum 24x24 | M12 | flush | 6 | 12 | 36 | 24 | - | |
| aluminum 36x36 | non-flush | 24 | 18 | 48 | - | 36 | |||
| 3-point calibration | steel 12x12 | M12 | flush | 0 | 6 | - | 24 | - | |
| steel 24x24 | non-flush | 10 | 12 | 36 | - | 24 |
M18 installation conditions (IGP20x)
| Application configuration | Target | Type | Installation | a | b | c | d | e | f |
|---|---|---|---|---|---|---|---|---|---|
| Factory calibration | aluminum 36x36 | M18 | flush | 9 | 18 | 54 | 36 | - | 8xSn |
| aluminum 54x54 | non-flush | 36 | 27 | 72 | - | 54 | |||
| 1-point calibration | aluminum 36x36 | M18 | flush | 9 | 18 | 54 | 36 | - | |
| aluminum 54x54 | non-flush | 36 | 27 | 72 | - | 54 | |||
| 3-point calibration | steel 18x18 | M18 | flush | 0 | 9 | - | 36 | - | |
| steel 36x36 | non-flush | 15 | 18 | 54 | - | 36 |
M30 installation conditions (IIP20x)
| Application configuration | Target | Type | Installation | a | b | c | d | e | f |
|---|---|---|---|---|---|---|---|---|---|
| Factory calibration | alumiunim 60x60 | M30 | flush | 15 | 30 | 90 | 60 | - | 8xSn |
| aluminum 120x120 | non-flush | 33 | 60 | 120 | - | 120 | |||
| 1-point calibration | steel 60x60 | M30 | flush | 15 | 30 | 90 | 60 | - | |
| steel 120x120 | non-flush | 33 | 45 | 120 | - | 120 | |||
| 3-point calibration | steel 30x30 | M30 | flush | 0 | 15 | - | 60 | - | |
| steel 60x60 | non-flush | 22.5 | 30 | 90 | - | 60 |
Device configuration
| Process data input | RecordT (32 Bit) | ||
| Distance | InterT (16 Bit) | ||
| Current object distance | |||
| Value range [m] | (200 to 2000) * 1E-06 | ||
| -32760 | (UL - underload) 0x8008 | ||
| 32760 | (OL - overload) 0x7FF8 | ||
| PDV scale | IntegerT (8 Bit) | ||
| not used PDV scale | |||
| Value range | -6 | (not used PDV scale) | |
| Device status | UIntegerT (4bit) | ||
| Current device status, a copy of the paramater [Device Status, Index 36] in the process data channel | |||
| Value range | 0 | (Device is OK) | |
| 1 | (Maintenance required) | ||
| 2 | (Out of specification) | ||
| 3 | (Functional check) | ||
| 4 | (Failure) | ||
| SSC1.2 | BooleanT | ||
| Current status of the digital signal [SSC1.2] | |||
| Value range | false | (OFF) | |
| true | (On) | ||
| SSC1.1 | BooleanT | ||
| Current status of the digital signal [SSC1.1] | |||
| Value range | false | (OFF) | |
| true | (On) | ||
| Distance | |||||||||||||||||
| Offest 0 | |||||||||||||||||
| Scale set = .6 | Device Status | ||||||||||||||||
| Offset 2 | |||||||||||||||||
Installation distances in millimeters
1-point calibration


- Step 1: Place the flat surface of the target directly to the sensing face
- Step 2: Look for “Application” section on moneo configure
- Step 3: Select “1 point calibration” click on “Execute command”
After approx. 5 seconds, a window should pop up reading, "Done - Paramaters succesfully written to device."
At that point, the 1-point calibration is successful.

3-point calibration
3-point calibration for the Pprox displacement sensor is teh most precise and accurate calibration method. It is suitable for small, non-uniform targets such as screw heads.
displacement sensor 3-point calibration
- Step1: Click on “3 point calibration”. Items [SMR]; [CMR]; [EMR] will show up.
- Step2: [SMR], click on “Execute command.” A window will be popped out, scroll down to check the correct distance and place the metal target to the distance and click “OK”.
- Step3: Repeat the steps for [CMR] and [EMR].
- Step4: Click on “Execute 3 Point calibration”. The calibration process will take approximately 2 seconds.

Once completed, the pop up will confirm that the parameters are successfully written to the device.